Translate Selected Text With A Keyboard Shortcut Using Crow Translate (X11 + GNOME Wayland)
I was looking for a way to easily translate selected text that works under GNOME with Wayland, and find out that Crow Translate provides just this, but with some tweaking.
Highlight some text on your Linux or Microsoft Windows desktop (web browser, text editor, etc.), press the assigned keyboard shortcut, and the text is instantly translated (using Google Translate, Yandex, Bing, LibreTranslate and Lingva) and shown in a new window that disappears when losing focus. It can also speak the selected text or the translation of the selected text. There are some browser extensions that can also do this, but Crow Translate can translate the text from any desktop application that lets you select text.
This feature works out of the box on any X11 desktop. Under GNOME with Wayland, the Crow Translate feature to translate selected text with a keyboard shortcut only works with XWayland applications by default, but manually setting up the keyboard shortcuts gets this to work with any application, including pure Wayland applications, so I thought I'd write about how to do this. This does not work on KDE Plasma with Wayland, and I'm not sure about other Wayland DEs, that's why this article only covers GNOME.
Crow Translate isn't just about using a keyboard shortcut to translate the selected text, but that's what I was interested in, and thought I'd share this with you. Crow Translate also includes a regular window where you can enter the text to translate, etc., as well as a tray icon.
Using Crow Translate to translate selected text is pretty straightforward. Select some text and press the global shortcut key, Ctrl + Alt + E by default (it can be changed from the application settings), and you'll be presented with a window that shows the translation of the text you've selected:
There you'll find options to change the source and destination languages (auto-detect by default), set the translation API (Google, LibreTranslate, Bing, etc.), as well as options to speak the original or translated text and copy either of them to the clipboard.
If you need it, you can also use a keyboard shortcut to get Crow Translate to speak the original selected text or the translation of the selected text.
The application also includes a very useful keyboard shortcut, which is not set by default (set in Settings -> Shortcuts), that allows copying the translation of the selected text to the clipboard without showing any UI. There's also support for translating text on screen that can't be selected, via OCR (using Tesseract), though this feature doesn't work on Wayland, at least on GNOME Wayland, which I'm using.
Getting Crow Translate to translate selected text on GNOME Wayland (with Wayland apps)
It's worth noting that for these keyboard shortcuts to work, Crow Translate needs to be running. Crow Translate uses a tray icon by default, but you can hide the tray icon from the application settings, and it will run in the background, allowing you to use the keyboard shortcuts for translating selected text. You may want to set it to start automatically at startup (Settings -> General -> Launch at startup) though, to have the keyboard shortcuts work after a system restart.
To set custom global keyboard shortcuts for Crow Translate, start by disabling the built-in shortcuts, so they don't interfere with our new custom shortcuts. This can be done from Crow Translate's Settings -> Shortcuts -> Enable global shortcuts (uncheck the box to disable it).
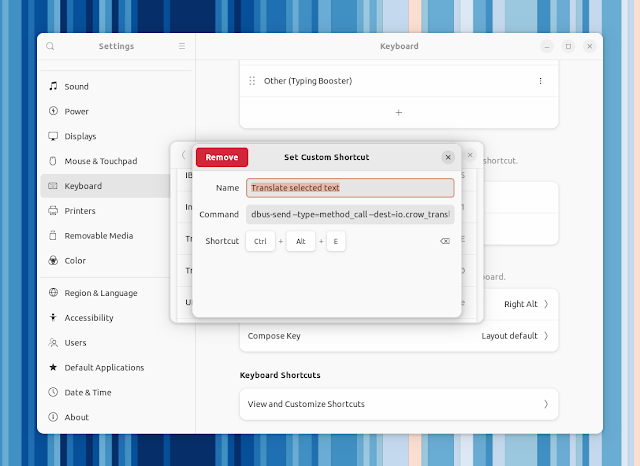
Now we'll create our own custom keyboard shortcuts for Crow Translate, replacing its built-in global shortcuts. Open GNOME Settings, click on Keyboard in the left-hand sidebar, scroll to the bottom and click on View and Customize Shortcuts. Here, scroll to the bottom again, and click on Custom Shortcuts.
Next, add some new shortcuts (only add those that you plan on using; you can set custom key binds instead of the ones below if you wish):
- Translate selected text (
Ctrl + Alt + E) command:dbus-send --type=method_call --dest=io.crow_translate.CrowTranslate /io/crow_translate/CrowTranslate/MainWindow io.crow_translate.CrowTranslate.MainWindow.translateSelection - Speak translation of selected text (
Ctrl + Alt + F) command:dbus-send --type=method_call --dest=io.crow_translate.CrowTranslate /io/crow_translate/CrowTranslate/MainWindow io.crow_translate.CrowTranslate.MainWindow.speakTranslatedSelection - Stop text speaking (
Ctrl + Alt + G) command:dbus-send --type=method_call --dest=io.crow_translate.CrowTranslate /io/crow_translate/CrowTranslate/MainWindow io.crow_translate.CrowTranslate.MainWindow.stopSpeaking - Translate selected text and copy translation to clipboard (no default keyboard shortcut, I'm using
Ctrl + Alt + O) command:dbus-send --type=method_call --dest=io.crow_translate.CrowTranslate /io/crow_translate/CrowTranslate/MainWindow io.crow_translate.CrowTranslate.MainWindow.copyTranslatedSelection
More about the D-Bus API on the application GitHub page.
Download Crow Translate
Note for Ubuntu 22.10 Kinetic Kudu users: In case you download the DEB from GitHub (which is a newer version than the PPA), to install it you'll need to have libtesseract4 installed on your system. This package no longer exists in Ubuntu 22.10 (it now has libtesseract5), but you can download the version from Ubuntu 22.04 and install it on Ubuntu 22.10, then you'll be able to install the Crow Translate DEB package downloaded from GitHub.


