A Quick Introduction To fzf (Interactive Command-Line Fuzzy Finder)
I've mentioned fzf a few times in the articles on Linux Uprising, but I've never actually written about it. fzf has been part of my workflow for a long time, and is an amazing tool which you should know about.
I realize many of you are already using fzf, but for those who don't, this article is for you. This is just a simple introduction to fzf, without going too much into details. The fzf project page and wiki provide extensive information about fzf, its usage, as well as many examples, so check those out for more information.
fzf is a fast, interactive command-line fuzzy finder written in Go. The tool is available for Linux, macOS, *BSD and Windows.
It can be used manually or in scripts by parsing the output of a command, using Shell extensions (which include fuzzy auto-completion for Bash and Zsh, as well as key bindings like CTRL-T, CTRL-R and ALT-C for Bash, Zsh and Fish), and as a Vim / Neovim plugin. There's also a Tmux script for launching fzf in a Tmux pane.
Here's what these fzf command-line keybindings do:
CTRL-R: search your command history. PressEnterto paste the selected command from history onto the command-line. Toggle the sorting relevance to chronological order by pressingCTRL-Ragain (by default, the sorting is done by relevance)CTRL-T: shows a list of files and folders in the current directory (and subdirectories). PressEnterto paste the selected file / folder path to the command lineALT-C: shows a list of subdirectories in the current directory. PressEntertocdinto the selected directory
By default, the search syntax allows typing multiple search terms delimited by spaces (fzf is started in extended-search mode). If you want to find exact matches, prefix the search term with a single quote (e.g. 'search-term). More on the fzf search syntax here.
The interactive fzf finder uses the following keybindings by default: ↑ / ↓ (or CTRL-J / CTRL-K or CTRL-N / CTRL-P) to move the cursor up and down, the Enter key to select an item, and CTRL-C (or CTRL-G / ESC) to exit. It also supports selecting multiple items when using the -m command line argument, and in that case you can select multiple items using TAB and Shift-TAB.
fzf also comes with mouse support, so you can click, scroll, double-click items, etc. For multi-select mode, you can use Shift-click and Shift-scroll.
Other fzf features include the ability to show a preview pane (--preview=COMMAND), set its height (e.g. --height 50%), add a border (--border), use custom keybindings, use different layouts (like a reverse layout), enable processing of ANSI color codes, and much more.
A few simple examples showing what fzf command-line fuzzy finder can do
Fuzzy search your shell history (CTRL-R):
Fuzzy completion for files and directories (this is triggered by ending the command with the trigger sequence, which by default is **, followed by pressing TAB):
cd **<TAB>In the same way, fzf can also autocomplete host names (e.g. ssh **<TAB>), as well as environment variables and aliases (e.g. export **<TAB>). It can also autocomplete process IDs, and in that case there is no trigger sequence, e.g. kill -9 <TAB>.
Find files in the current directory (and subdirectories), and when selecting a file (by pressing the Enter key), the file is opened via your default command line editor:
editor $(find * -type f | fzf)Combine it with other commands for a cool interactive console UI with fuzzy search and a preview pane. E.g. the following command (via) uses fzf and apt to list all available packages, allowing you to install a package by pressing ther Enter key. Here, fzf is used with the --preview option to show a preview pane (in this case it shows the selected DEB package details):
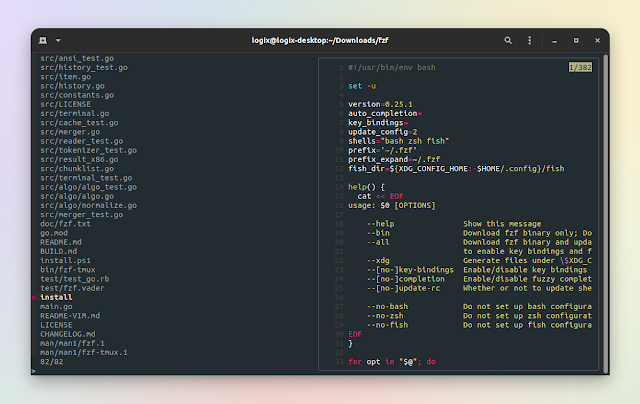
apt-cache search '' | sort | cut --delimiter ' ' --fields 1 | fzf --multi --cycle --reverse --preview 'apt-cache show {1}' | xargs -r sudo apt install -yFor the screenshot at the top of this article, I'm using the following command (it requires bat, a cat clone written in Rust which includes syntax highlighting and more):
fzf --preview 'bat --style=numbers --color=always --line-range :500 {}'For more advanced examples, check out the fzf wiki.
I've also written on Linux Uprising about a few command line tools / scripts that make use of fzf fuzzy finder:
- forgit: Interactive Git Commands With Previews Powered By fzf Fuzzy Finder
- ytfzf - Search (With Thumbnails) And Play YouTube Videos From A Terminal
- z.lua - A Faster Way Of Changing Directories (cd Command That Learns As You Use It)
Install fzf fuzzy finder
fzf is available for Linux (including various ARM versions so it works on e.g. Raspberry Pi), macOS, *BSD and Windows.
On Linux, fzf can be installed from the repositories on Debian9+, Ubuntu 19.10+, Fedora, Arch Linux, openSUSE, etc.
However, I personally prefer to install it using its installation script (it automatically downloads the binary for your system, without building it from source). That's because it sets up everything for you, with the only thing being needed is sourcing the shell config file. It's also easy to update to newer fzf versions (they are released fairly often).
To install fzf using its installation script, make sure you have git installed, then use:
git clone --depth 1 https://github.com/junegunn/fzf.git ~/.fzf
~/.fzf/installThe installation script will ask you some questions about what features to enable. You'll most probably want to answer yes (y) to all of them.
That's it. Now all you have to do is restart your shell or reload config file:
- Bash:
source ~/.bashrc- Zsh:
source ~/.zshrc- Fish:
fzf_key_bindingsUsing this installation method, if you later want to update it (both the completion and the binary), use:
cd ~/.fzf
git pull
./installIt's also easier to uninstall it (this undoes the changes made to ~/.bashrc or ~/.zshrc, and removes the Fish keybindings from ~/.config; it does not remove the ~/.fzf directory):
cd ~/.fzf
./uninstall


